Saturday, July 30, 2016

Iridium flare, 2016-Jul-29

Iridium 37, York County, VA. July 29, 2016, 10:03 p.m. EDT. Canon 50mm f/1.8 lens at f/4.0. Canon 550D, 90 sec exposure at ISO800 with Polarie Sky Tracker.
George Reynolds brought this Iridum flare to our attention over on the Back Bay Amateur Astronomers forum today so I thought I would give it a shot. The maximum brightness was only magnitude -1 at my location, but in Virginia Beach where the club is hosting an event tonight, they got to enjoy magnitude -8 and an ISS overpass within a minute of the flare!

This is the first time I went after an Iridium flare. It is poorly framed and nothing spectacular, yet I really enjoyed the anticipation of the event. I consulted Heavens Above for where to point my camera and walked down the street to find a view between the trees while avoiding porch lights. Since I had only 5 minutes to prepare, I quickly polar aligned my Polarie Star Tracker (poorly as it turns out) and estimated the exposure time. While I was working the math in my head on when to open the shutter, I saw the Iridium satellite already approaching my field of view, so I just tripped the shutter and let the cards fall where they may.

After the satellite passed, I tried gathering five more frames with the intention of making a mosaic showing the flare in relation to Cygnus. I discovered later that I did not get enough coverage for the mosaic, so I just have this one image. It's a shame too, because the parts I did capture hinted that the mosaic would have been really cool. Ah, well. Better luck next time. I'm kind of hooked now!

Thursday, July 28, 2016

Summer Milky Way over Skyline Drive

“Summer Milky Way over Skyline Drive”, Beagle Gap overlook at Shenandoah National Park. July 9th, 2016. Three panel mosaic, 30 second exposures at ISO3200 (sky), one 180 second exposure at ISO800 (foreground), Canon 550D, Rokinon 16mm f/2.0 lens at f2.4, Vixen Polarie Sky Tracker at 1/2 sidereal rate (sky) and fixed (foreground). Full resolution version here: http://www.astrobin.com/256990/  
Here is an image of the Milky Way over Skyline Drive in Shenandoah National Park, taken from the Beagle Gap overlook soon after I captured my panorama over Rockfish Valley in early July. I was thankful that I had purchased an annual pass to the park a few weeks earlier because I could visit my favorite place in Virginia at any time. On this occasion, I arrived around one in the morning, a little tired but determined to capture the night sky over the Blue Ridge Mountains. As I drove north along Skyline Drive I had to slam on the brakes at least four times as adolescent raccoons darted across the road, sending expensive camera gear tumbling around in the trunk.

After a short drive into the park I arrived at the Beagle Gap overlook, where I hopped out to scan the view and make sure the Milky Way was in a position that complimented the landscape. Indeed, the view was magnificent. The Milky Way arched from Bucks Elbow Mountain in the north and descended into Skyline Drive in the south. Perfect! When I returned to my car to shut off the engine I realized that I was more tired than I thought because I had left the car in drive and had only applied the emergency brake. Let’s put this another way...I almost let my car drive itself off the side of a mountain!

I quickly sat up my gear and began capturing a three-panel mosaic of the view along Skyline Drive. The teapot asterism in Sagittarius was perfectly framed between the trees at the time, but ultimately it was overwhelmed in my picture by the countless stars of the Milky Way.  My whole strategy for framing the mosaic was fraught with rookie mistakes (technical details below), in part because this was only my second attempt at a multi-panel image but also because the silence of the park, though peaceful any other time, was a bit unnerving in the darkness. Just an hour earlier I had visited Raven’s Roost along the Blue Ridge Parkway where the wind howled and shook the trees, yet here a perfect silence was interrupted only by the sound of a twig breaking occasionally in the woods…and nothing else. As any Virginian knows, the Blue Ridge Mountains is home to the densest population of black bears in the eastern United States. This fact was hot on my mind each time a twig broke. Every time I go imaging I have a bright flashlight in my pocket which I’ve named the “WTF was that!?” light. You better believe I had that thing blasting into the darkness at each tiny sound!

Once I finished capturing the view to the south and realized that bears probably weren’t pacing along the outskirts of the overlook, I turned my attention to Bucks Elbow Mountain to the north. By this time clouds had rolled in overhead which then scattered light pollution from Charlottesville and Shenandoah Valley, hence their orange color. I captured a six panel panorama spanning the overlook on the left to Charlottesville on the right. The Andromeda Galaxy is visible toward the middle which is pretty cool. I’m not too crazy about this image though because the color cast on the clouds is not very attractive in my opinion. The location is nice, so I may attempt this scene at another time.

“Starry, Cloudy Night over Bucks Elbow Mountain”, Beagle Gap overlook at Shenandoah National Park. July 9th, 2016. Eight panel mosaic, 30 second exposures at ISO3200, Canon 550D, Rokinon 16mm f/2.0 lens at f2.4, Vixen Polarie Sky Tracker at 1/2 sidereal rate.
Between these shots and my panorama over Rockfish Valley, I had three nightscapes in the bag, which is a successful night given the months of cloud-cover we have endured. I packed up and headed out of Shenandoah National Park around two o’clock, dodging a few more raccoons along the way. After a long, sleepy drive, I arrived home three hours later, ready for some well earned rest and overjoyed with the incredible night I experienced in the Blue Ridge Mountains.

Technical notes:
The Skyline Drive image is a mosaic of three images tracked at ½ sidereal rate at high ISO for the sky and one stationary shot at low ISO for the foreground. I generated two panoramas, one with the three sky images and the other with two sky images and the low ISO foreground image. I must have moved the foreground exposure slightly with respect to the sky images because the two panoramas did not line up perfectly after stitching. Even more difficult, the panoramas are made as stereographic projections so I had to warp and scale the panorama with the foreground to make it match up with the high ISO sky panorama. Looks like I need to plan these types of shots more carefully. The sky and foreground are processed separately, boosting the shadows in the roadway and modestly increasing contrast in the sky. I corrected the light pollution color cast at the very top of the image using a method suggested by Roger Clark which worked out really well.

-------------------------------------------------------------------------------------------
Processing Workflow
(LR) Lightroom, (ICE) Microsoft Image Composite Editor, (PS) Photoshop CC, (PI) Pixinsight
-------------------------------------------------------------------------------------------
"Summer Milky Way over Skyline Drive"
1. Raw conversion: correct lens distortion, exposure -0.75 (sky) -1.0 (foreground), blacks +20 (sky) +60 (foreground). Export individual panels as sRGB 16-bit .tiffs (LR)
2. Stitch panels tracked sky photos into panorama and also two upper tracked sky photos with lower stationary foreground photo into panorama (ICE, stereographic projection)
3. Open two panoramas as layers and align using warp/scale tools (PS).
4. Generate foreground selection by duplicating foreground layer, adjusting exposure offset, gamma correction and brightness to darken the foreground and brighten the sky. Use magic want to select foreground and then select/similar. Convert to mask. (PS)
5. Apply mask to foreground image such that only foreground portion of that panorama is visible. (PS).
6. Correct light pollution in sky by selecting a small area near the top-left away from the Milky Way and lowering the black point of the green and red channels until the left side of the RGB histograms lign up (PS, Curves adjustment layer with mask protecting foreground).
7. Contrast curve for the sky (PS, Curves adjustment layer with mask protecting foreground).
8. Increase overall exposure (PS, Brightness/Contrast adjustment layer).
9. Noise reduction (PI, ACDNR to lightness and chrominance, iterations reduced to 2 in lightness, lightness mask enabled, also applied a range mask permitting only 20% of noise reduction in foreground since I primarily wanted noise reduction in the sky).
10. Increase color saturation (PI, ColorSaturation, excluding green with lightness mask).
11. Increase foreground brightness (LR, Shadows +50)
12. Crop (LR)
13. Export as .tiff, jpeg (LR)

"Starry, Cloudy Night over Bucks Elbow Mountain"
1. Raw conversion: correct lens distortion, chromatic aberration, exposure -0.5, blacks +0.25, tone curve to boost foreground brightness (LR).
2. Stitch panorama (ICE)
3. Noise reduction (PI, TGVDenoise to Lightness, strength 5, edge protection 3E-4, iterations 200, extracted lightness as local support and inverted lightness as mask).
4. Correct light LP by lowering G and R curves until RGB histogram peaks align based on a sky-only selection near the top (PS)
5. Increase contrast (PS, Contrast)
6. Desaturate strongly scattering LP yellow near horizon (PS, saturation adjustment with color mask selecting yellow).
7. Increase foreground exposure (PS, exposure adjustment with mask selecting foreground).
8. Increase overall exposure (PS, exposure adjustment)
9. Crop (PS)
10. Fill in a small section where the images left a gap in the foreground grass. I am very uneasy with doing this and don’t plan to make a habit of it, so don’t tell anyone! (PS, duplicate layers and shifting to place grass from another location to where it is missing).
11. Reduce green cast (PI, SCNR to green, 0.15 w/ range mask protecting foreground).
12. Export as .tiff, JPG


Friday, July 22, 2016

Moonrise over James River, self-portrait

Self-portrait with moon rising over the James River on July 21st, 2016. Canon 550D, Canon 50mm f/1.8 lens @ f/4.0, exposure: 30sec @ISO200, custom white balance. 
Caught the moon rising over the James River tonight from a beach on the Colonial Parkway near Jamestown. Clouds and haze conspired to redden the moon which looked really cool just after it topped the horizon. Light pollution from Norfolk and Hampton also illuminate the sky orange/yellow in this photo. I made no attempts to correct the light pollution color cast because I like the monochromatic delivery. Processing is bare-bones - boost the shadows slightly, add a contrast curve and apply lens corrections with Lightroom. I liked the image straight out of the camera, so no need to fiddle with knobs that don't need fiddling.

Wednesday, July 20, 2016

Milky Way Over Rockfish Valley

Rockfish Valley Overlook, Blue Ridge Parkway, Virginia. July 9th, 2016. Ten panel mosaic, 40 second exposures at ISO3200, Canon 550D, Rokinon 16mm f/2.0 lens at f2.4, Vixen Polarie Sky Tracker at 1/2 sidereal rate. High resolution version here: http://www.astrobin.com/256288/

After a month of persistent cloud cover, the Clear Sky Clock announced a mostly clear night in western Virginia on a Saturday. Perfect, I thought. For a while I have wanted to capture the Milky Way from Rockfish Gap Overlook on Interstate 64 near the Blue Ridge Parkway, so I packed up my wide-field imaging gear and drove west, well before sunset.

High-level cirrus permeated the evening sky as I left town along with some large cumulus floating about that I reassured myself would clear out by the time I made it 2.5 hours away to the mountains. But mile after mile, the amber glow of the sun reflecting off those clouds lit up the sky like an orange peel and looking far to the west showed nothing but red and grey clouds, destined to obscure the night sky. I began to feel more and more foolish with each passing minute, knowing that if I arrive to mountains veiled in cloud cover, I would have to turn around and drive 2.5 hours back home with my tail between my legs - five hours wasted for nothing! Suddenly, I remembered a quote that my father would often say to me. I could hear his voice clearly,

“Far better is it to dare mighty things, to win glorious triumphs, even though checkered by failure... than to rank with those poor spirits who neither enjoy nor suffer much, because they live in a gray twilight that knows not victory nor defeat.” - Theodore Roosevelt

He was right. It is too easy to give up and never know what the mountains would give me that night. Great things are accomplished by hard work, lost sleep and sacrifice, never by laying on the couch and not even trying. Besides, anyone that has ever accomplished anything great from the couch is an asshole.

Re-invigorated, I pressed onward and arrived at Rockfish Gap around 10 p.m. Astronomical twilight had not yet ended so I decided to explore south along the Blue Ridge Parkway to kill some time. Within a mile, I stumbled upon Rockfish Valley Overlook, pictured above. Now this was the view I was looking for! A wide-open vista with the Milky Way arched over the hazy-blue valley, diving into a mountain range to the south. The stars twinkled above the shimmering lights of the town below while Mars and Saturn shone boldly among the stars of Scorpio.

I quickly sat up my gear and got to work, all the while having a pleasant conversation with a local who was also taking in the view. I soon realized that this was a popular overlook. Car headlights blasted the area every minute or so, some cars careening into the turn-off to peer into the valley. This was a real challenge because the headlights caused the foreground to overexpose and I would have to start over again.

I took over a dozen overlapping exposures, hoping to capture the breadth of the overlook in a multi-frame mosaic. Later I learned that I missed some landscape and sky on either side and that I couldn’t crop the part that I did capture in a satisfactory way, so I left the mosaic uncropped. With a little better planning, I may try this shot again, probably in the morning when there is less traffic.

What I really like about Rockfish Valley Overlook is how peaceful the town lights look below the glow of stars above. They almost look like lights from a model railroad town, quiet and serene. I’m not sure how well I captured that in my photo. I think the juxtaposition of the frail Milky Way against the bold, yellow city lights illuminating the clouds along the horizon is the stronger story. Who is winning here? Man or cosmos? We have built a world of concrete, steel and lights - a testament to the dominance of humankind over the natural world, when in reality we are temporary tenants of a stone hurling around an ordinary star in an unimaginably large space. Our sense of self-importance needs tamed from time to time.

I packed up around midnight, thinking about the comforts of beer and couch some 2.5 hours away. As I drove towards the interstate I realized that I have traveled this far from home, so why call it a night now? There is still plenty of darkness and adventure to behold! With that, I turned toward Shenandoah National Park in search of more starry wonders. I’ll continue the story in my next blog post.

Technical notes:
This image is a composite of ten 40 second exposures in landscape orientation on a Vixen Polarie Sky Tracker at ½ sidereal rate, ISO3200, f/2.4, custom white balance. I learned that I cannot turn the camera into portrait orientation when facing south because on the camera bumps into the Polarie body. Facing north, this is not an issue.

For post-processing, I gave Adobe Photoshop and Lightroom a shot and I must admit that I really like this software for landscape astrophotography. Lightroom Photo Merge stitched all ten panels together seamlessly. I used PixInsight for noise reduction and then processed the rest using adjustment layers in Photoshop with a soft hand.

-------------------------------------------------------------------------------------------
Processing Workflow
(LR) Lightroom, (PS) Photoshop CC, (PI) Pixinsight
-------------------------------------------------------------------------------------------
1. Correct lens distortion, chromatic aberration, exposure -1, blacks +25, tone curve to boost darkest values, export individual panels as sRGB 16-bit .tiffs (LR)
2. Stitch panels into panorama, export as sRGB 16-bit tiff with transparency (LR, Photo Merge, spherical projection)
3. Noise reduction (PI, TVGDenoise to lightness, strength 5, edge protection 2E-4, iterations 200; w/extracted lightness mask as local support and inverted lightness mask to target darker areas).
4. Correct light pollution by selecting previews at various parts of the sky away from the Milky Way and adjusting the red and green curves until the RGB histograms overlap (PS, Curves with mask protecting the foreground with transparency 60%).
5. Increase sky contrast with strong “S” curve (PS Curves with mask selecting the sky).
6. Accentuate contrast between Milky Way dust lanes and brighter regions (PS, Curves with mask selecting sky).
7. Lower sky background brightness slightly (PS, Curves with mask selecting sky).
8. Increase overall brightness (PS, Exposure +0.9).
9. Increase sky contrast (Brightness/Contrast adjustment, PS, Contrast +18)
10. Adjust contrast and brightness of foreground to soften transition to sky (PS Curves with mask selecting foreground).
11. Darken sky slightly (PS, Curves with mask selecting sky).
12. Add dark color around borders (PS, Paint Bucket, RGB = 12, 12, 12).


Thursday, July 7, 2016

Jupiter rising over the Chesapeake Bay, January 11, 2016

Canon 550D, Rokinon 16mm f/2.0 lens @ f/2.0. Exposure: 20 sec @ ISO3200. January 11, 2016, 11:54 p.m.
Here is an image of Jupiter rising over the Chesapeake Bay taken this past January at Bethel Beach Natural Area Preserve, Virginia. My, how things have changed since then! Jupiter was rising around 10 p.m. in January and now is setting in the evening after giving amateur astronomers a marvelous show this spring. During this apparition I witnessed a Jovian moon transit, two shadow transits and had enjoyed my best views of the Great Red Spot. Now we can look forward to Juno’s discoveries over the coming months!

This was my first night out with my Rokinon 16mm f/2.0 lens and mainly I wanted to test how long I could expose on a stationary tripod without excessive star trailing. The 20 second exposure roughly follows the “rule of 200” for a 16mm lens on a crop sensor. Star trailing is apparent when mildly zooming in on this image, but it is not quite objectionable without zooming. Still, I am anxious to try this out with my Vixen Polarie Star Tracker at 1/2 sidereal rate.

For processing, I retained a custom white balance and made no effort to correct for the orangish-yellow cast due to Hampton Roads light pollution which illuminates the scene. I used a mask to select the sky and foreground separately, though this mask did not select these two elements exclusively (selecting the sky still selected about 7% of the foreground). I think this helped make the transition from foreground to sky less artificial due to the differences in processing the two. Most of the heavy lifting for noise reduction was completed by TGVDenoise and MultiscaleMedianTransform to chrominance, but I really liked how Manfred Schwarz’s RemoveDarkPixel and RemoveHotPixel PixelMath expressions cleaned up the salt and pepper noise due to the high ISO I used.

-------------------------------------------------------------------------------------------
Processing Workflow (PixInsight)
-------------------------------------------------------------------------------------------
1. Correct hot pixels, save .CR2 as .xisf (CosmeticCorrection, CFA, Auto Detect, Hot Sigma 1.3)
2. Apply in-camera custom white balance
2a. Using exifftool, extract Red_Balance, Blue_Balance and Average_Black_Level from .CR2 metadata. Since PixInsight reads the .xisf file as 16-bit, divide each of these values by 65536.
2b. Open .xisf image from step 1 as Pure Raw.
2c. Scale the image to account for the black level by applying PixelMath expression: ($T - Black_Level)/(Saturation - Black_Level). Here, I assume Saturation is the maximum 14-bit value (0.25 after dividing by 65536).
2d. SplitCFA
2e. Apply PixelMath expression to CFA0: CFA0*Red_Balance
2f.  Apply PixelMath expression to CFA3: CFA3*Blue_Balance
2g. MergeCFA
3. Non-linear stretch (MaskedStretch).
4. Reduce noise (TGVDenoise in CIE L*a*b* mode, lightness edge protection 1e-4, chrominance strength 3 and edge protection 2e-3, iterations 200, local support extracted L image; applied w/ inverted lightness mask).
5. Increase image brightness (CurvesTransformation to RGB/K, lower midtones slider).
6. Create mask to select sky by extracting blue channel, convolving, clone-stamping out stars and then convolving again.
7. Contrast curve in the sky (CurvesTransformation w/mask selecting sky).
8. Neutralize sky at the very top of the image (BackgroundNeutralization using preview at top; w/mask selecting sky)
9. Darken shadows in sky (CurvesTransformation to RGB/K w/mask selecting sky).
10. Increase saturation (CurvesTransformation, C channel).
11. Large scale chrominance noise reduction (MultiscaleMedianTransform to Chrominance using David Ault’s recipe [reference below] w/inverted luminance mask).
12. Increase contrast in foreground shadows between the plants (CurvesTransformation w/mask selecting foreground).
13. Reduce dark speckle noise (PixelMath with RemoveDarkPixel expression by Manfred Schwarz [reference below]).
14. Reduce hot speckle noise (PixelMath with RemoveHotPixel expression by Manfred Schwarz [reference below]).
15. Sharpen image (MultiscaleMedianTransform, bias +0.03 to layer 4 of 5).
16. Crop to 5x7 aspect ratio (DynamicCrop).
17. Resample by 50% for web (Resample).

References:
“M42 PixInsight Tutorial” by David Ault for linear noise reduction
http://trappedphotons.com/blog/?p=642

Manfred Schwarz’ galaxy tutorial:
http://www.astrophoto.at/PixInsight/

Tuesday, July 5, 2016

Lens aberrations and pixel scale with my Rokinon 16mm f/2.0 lens

Last January I took my new Rokinon 16mm f/2.0 lens out for a spin to characterize the lens aberrations. The animation below shows that coma clears up pretty well along the edges by f/4, but it appears my copy has some lens tilt because the right hand side exhibits a bit more coma than the opposite side.
Modified Canon 550D, 20 second exposures, Rokinon 16mm f/2.0 lens. 
The lens tilt is pretty obvious in contour plots of star full width half maximum (FWHM) and eccentricity, shown below. The largest FWHM is on the right hand side which is consistent with my previous observation. Things improve by f/4.0 where FWHM is only 60% larger in the lower right corner compared to top-center. It is 100% larger at f/2.0. I’m not sure what to make of the median eccentricity increasing with higher f ratio.
FWHM and eccentricity at f/2 and f/4 from the animation above, plotted via PixInsight’s AberrationInspector script. Note that the shading scale is different between the images.
Though the first few images with the lens look promising with my Canon 550D, I am becoming concerned that it is not the best fit for my Canon 1000D due to the different pixel scale (56”/px vs 70”/px, respectively). Recently I captured the Summer Triangle with my 1000D and Rokinon lens and found the bijillion tiny stars were heinously undersampled in the image. This is not a surprise given the pixel scale, but it looks like debayering struggled, causing pure colors along the star edges. I hope that dithering, which I have not yet attempted with this lens, will help with this issue. I did not notice this level of undersampling in my image of the Big Dipper taken with my 550D, but in all fairness, the Milky Way region is far more smattered in tiny stars so it is not a fair comparison. In the future I would like a head-to-head match between the 1000D and 500D with the same field of view and same lens. It could just be that undersampling to this degree is just the way things are. Looks like more testing to do and possibly a conversation with the folks at Rokinon about the suspected lens tilt.

Undersampled stars, cropped image near Milky Way. Canon 1000D, single 240 sec exposure, ISO800, Rokinon 16mm f/2.0 lens @ f/4.0, Losmandy G-11 mount.


Monday, July 4, 2016

Starry night from suburbia

Captured June 25, 2016. Canon 1000D, Rokinon 16mm f/2.0 lens @f/2.0, 30 second exposure @ ISO 1600. Custom white balance.
Here is an image of the night sky facing east from my neighborhood, taken for fun while my other camera was occupied capturing another object. The brightest star near top-center is Deneb in Cygnus. The North American Nebula is evident just beneath Deneb and nebulosity near Cepheus is also visible on the left.

The sky was actually pretty washed out due to light pollution in the original 30 second exposure so I used a mask to select only the sky and reduce the brightness. This is a tricky task because it is easy for the transition from foreground to sky to look unnatural with a mask. I am new to landscape astrophotography processing so I may or may not have pulled this trick off very well - I am certainly dancing on the line between believable and novice. The foreground lighting is really interesting with the high contrast, multiple shadows and variety of color temperatures. Believe it or not I get pretty decent image from here! I only cropped the bottom of the image, so lens aberrations are readily visible at the top. Despite the aberrations, the Rokinon 16mm f/2.0 is a really fun lens. Wide angle shots like this remind me of images from the film days that inspired me to pursue astrophotography. I appreciate the simplicity of the technique and connection between Earth and sky it emphasizes.

-------------------------------------------------------------------------------------------
Processing Workflow (ACR for first step, then PixInsight)
-------------------------------------------------------------------------------------------
1. Open .CR2 in Adobe Camera Raw, save as .TIFF with “as-shot” white balance applied and no other modifications.
2. Open .TIFF in PixInsight for remainder of processing steps.
3. FastRotation 90 degrees counter-clockwise
4. Create mask to select sky/foreground by extracting blue channel (greatest contrast between foreground & background) then using range mask (smoothness 2.0) to select most of foreground. Clone stamp remaining foreground.
5. Neutralize sky (BackgroundNeutralization on preview near top with range mask selecting sky).
6. Reduce sky brightness (GammaStretch, R/K 1.66 with range mask selecting sky).
7. Increase contrast in sky gently with subtle “S” curve (CurvesTransformation to RGB/K with range mask selecting sky).
8. Increase color saturation of H-alpha in sky (CurvesSaturation, increasing all colors but orange which was mostly light pollution, with range mask selecting sky)
9. Reduce contrast in foreground by increasing brightness in shadows and decreasing brightness in highlights (CurvesTransformation to RGB/K with range mask selecting foreground).
10. Reduce noise (ACDNR to luminance and chrominance with lightness mask).
11. Repair vignetting in upper-left hand corner where lens hood was accidentally rotated and darkened a small bit of that corner. Increased brightness of that area very selectively (CurvesTransformation to RGB/K with range mask selecting sky).
12. Increase color saturation of foreground (CurvesTransformation to RGB/K with range mask selecting foreground).
13. Increase color saturation of sky a little bit more (CurvesTransformation to S with range mask selecting sky).
14. Repair a few hot pixels with CloneStamp.
15. Make stars sharper (MultiscaleMedianTransform +0.1 bias to layer 2 with mask selecting stars generated by extracting B channel (greatest contrast between stars and sky) and using range mask, smoothness 2.0).
16. Sharpen (UnsharpMask, amount 0.39 with luminance mask).
17. Blur words on street signs by duplicating image, convolving the duplicate twice and then using CloneStamp to copy the blurred areas to the original image.
18. Final crop to 5x7 aspect ratio (DynamicCrop)

Friday, July 1, 2016

Meteor trail passing through Orion Nebula


Explore Scientific ES127mm apochromatic refractor, Canon 550D, single 450 sec exposure @ ISO400, October 25, 2014.


A recent thread on Cloud Nights asked folks to share examples of satellites/planes and other spurious objects they’ve captured so I dug up this an image of a meteor trail I caught while imaging M42 at the Staunton River Star Party two years ago. Nearly every single one of my subframes had satellites passing through it due to the high density of geostationary satellites “parked” in that direction. The transient object in this subframe was different than the others however because it looked more like a smoke plume rather than a line which is consistent with the ionization trail of a meteor passing through the atmosphere. What a lucky capture!

Antares region with Saturn, first night with Vixen Polarie Star Tracker

Antares region with Saturn taken near Cobb Branch, VA on June 8th, 2016. Canon 550D, Canon 50mm f/1.8 lens @ f/4. Total exposure, 3.2 hours (117 x 100 sec) @ ISO1600 on Vixen Polarie mount. 
Full resolution image here: http://www.astrobin.com/253791/

Here is my image of the Antares region with Saturn as a guest “star”, taken soon after the last new moon timeframe which was also our first clear night in months. Desperate for any opportunity to get back out and image, I drove 1.5 hours from my home on a weeknight to a deserted road among the peanut farms of southern Virginia where light pollution was minimal in the southern skies. The four day old moon illuminated the sky for the first hour of acquisition, but the remaining two hours yielded images with good contrast between the foreground dust and background. This was my first time at this location which I discovered by consulting light pollution maps and Google Maps satellite imagery. The Milky Way was unmistakable during the whole time I was there and not a single car passed during the night. I shut everything down around 2:30am after coming to my senses and realizing that I’ll need to be getting ready for work within 90 minutes of returning home. It was a sleepy day at the office the next morning, but I was well rewarded by over three hours of dark-sky exposure time on the Antares region which I have been anxious to capture for years.

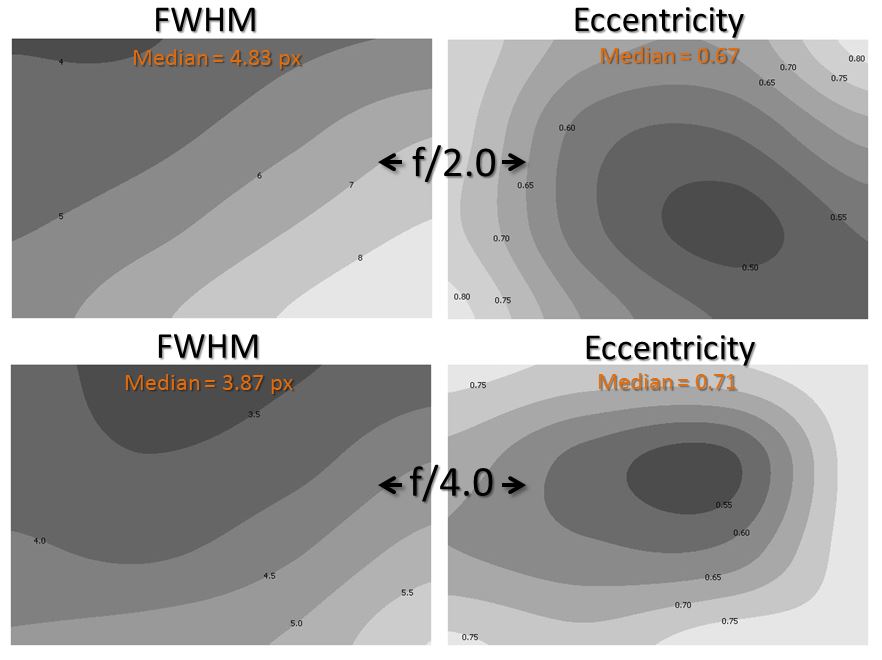
This was also my first serious efforts with my Canon 50mm f/1.8 lens and Vixen Polarie mount. The camera lens needed to be stopped down to f/4 to suppress lens aberrations to my satisfaction. Regardless, there still is some coma and astigmatism along the left and right edges which is not all that noticeable when looking at the full image without zooming. Note, however, that the final image above has been cropped. The lens produces some pretty significant flare on the brighter stars in the image owing to the ultra-red sensitivity of my UV/IR-modded camera.  I had to deal with extensively with these lens flares in post-processing by creating masks to select them and then suppressing color saturation. The lens flare is my one disappointment for an otherwise remarkable deal for a prime-focus lens. One benefit that I really like is that I can focus the lens using BYEOS which really made checking focus regularly during the night a snap.

Close-up of lens flare on Saturn, Antares and Dschubba early in non-linear processing, prior to flare reduction (clockwise from top-left).

My Vixen Polarie is probably my new favorite piece of gear. It was quick to polar align and I could not detect periodic error in 100 second exposures on this night. I have subsequently performed 240 second exposures with this same lens and crop-sensor camera at 30 degrees declination without evidence of periodic error. Nice! The batteries lasted over the 5 hours I operated the mount (ambient temp, 65deg F) with the light was blinking at the end, signaling low battery power. That is plenty of time for fair weather imaging sessions. I did not attempt any dithering for this inaugural imaging session with the Polarie, but as it turned out there was a slow drift in the frames from top to bottom, probably by 60 pixels or so over the 3.5 hour period which ultimately helped in image integration rejection algorithms. My hunch is that this is differential flexure since the drift is in the direction of gravity. I do use the ballhead recommended by Vixen for the Polarie, so perhaps I just need to tighten the clutch a bit more. Still need some investigation there. At some point I need to develop a dithering strategy for this mount.

In order to improve contrast in the stacked image due to moonlight during the first hour of exposure, I weighted the subframes by the inverse of the median ADU using David Ault’s SubframeSelector weighting spreadsheet. Weights ranged from 40-100% with the brightest image receiving the lowest weight. This improved contrast substantially compared to averaging with equal weight or noise evaluation.

Even though my data was acquired at a relatively dark location, I still had to battle with a light pollution gradient emanating from the lower-right corner. Choosing where to place background samples for DynamicBackgroundExtraction (DBE) proved to be difficult due to the colors caused by dust in regions that initially appear as “background”. In all cases, I did not realize the mistake until late in processing after non-linear stretching and color saturation. For instance, one time DBE subtracted too much near the Milky Way which practically zapped (reduced to nearly zero) the dust lanes in the lower left. Another time I realized twenty steps into processing that DBE caused a dark olive-green color cast to the background in the upper left whereas the color of the background in the upper right was neutral. It took a careful selection of very few sample points to achieve a background model that doesn’t cause these problems. Surely it is not perfect, but good for my standards at this point in time.

Color calibration turned out to be tricky. Initially, I only used the stars on the right-hand side of the image for a white reference, figuring that the stars in the direction of the Milky Way would be artificially reddened due to preferential extinction of short wavelengths by dust. My hunch did not work out so well because late in processing I realized there was a red color cast in the highlights that was difficult to wrangle out. So I started from scratch and used all the stars in the image as a white reference, curing the red color cast.

I really wanted the dust to be the focus of the image, so I spent a lot of time in post-processing trying various tricks I’ve learned over these past two years to bring out the dust. After processing this image five times over, I hit pay-dirt on the sixth try using Jerry Lodriguss’ screen-mask-invert (SMI) method which really made the dust pop. After reducing the background brightness, LocalHistogramEqualization and the DarkStructureEnhance script worked marvelously to increase contrast in the dark dust lanes extending from the Antares region. Contrast in the Milky Way dust lanes was increased by masking the image with the extracted green channel (which had the most contrast between dust and the rest of the Milky Way) and applying a standard “S” contrast curve with CurvesTransformation. Finally, I reduced the sizes of the bijjillion small stars a bit more than I usually do to further allow the dust features and brightest stars to stand out.

I am very happy with how this image turned out. It was worth the lost sleep and bug bites to capture this icon of summertime. Still, I am not through with this region by a long shot! I really want that 180mm focal length view of Rho Ophiuchi and also a mosaic of Scorpius in its entirety. This is one of those regions that will keep astrophotographers busy until the end of time.

-------------------------------------------------------------------------------------------
Pre-Processing Workflow (PixInsight)
-------------------------------------------------------------------------------------------

1. Calibrate with flats, darks, bias. Debayer, register.
2. Weight subframes by inverse of median ADU value since the moon was present during the first hour. Weights ranged from 40-100% with the subframe having the highest median value given 40% weight. Formula taken from David Aults weighting spreadsheet (SubframeSelector).
3. Integrate using weights (ImageIntegration, Windsorized Sigma Clipping rejection).

-------------------------------------------------------------------------------------------
Processing Workflow (PixInsight)
-------------------------------------------------------------------------------------------

1. Initial crop to remove low SNR stacking artifacts along edges (Dynamic crop).
2. Remove gradients (DynamicBackgroundExtraction, subtract).
3. Neutralize background (BackgroundNeutralization using preview in upper right).
4. Set white balance (ColorCalibration, use entire image as reference w/structure detection enabled).
5.  Set luminance coefficients to 0.333333 for RGB channels (RGBWorkingSpace).
6. Non-linear noise reduction (TGVDenoise with inverted luminance mask à la David Ault’s recipe, reference below)
7. Repair overexposed star cores for brightest star
7a. Execute Repaired HSV Separation script
7b. Combine H, S and V images through mask selecting only the brightest star cores (ChannelCombination)
8. Non-linear stretch, lower midtones slider (HistogramTransformation)
9. Reduce color saturation of reddish/magenta lens flare on bright stars.
9a. Generate mask selecting lens flare by extracting X and R channels (ChannelExtraction) then multiplying the two together with PixelMath, CloneStamp to remove the rest and ATrousWaveletTransform to remove tiny stars (deselect first two wavelet layers), curves transformation to increase mask aggressiveness.
9b. Reduce color saturation of red/magenta (ColorSaturation through flare mask X 2)
10. Increase color saturation (CurvesTransformation to S channel with luminance mask selecting foreground).
11. Brighten dust and image in general with Jerry Lodriguss’ SMI technique [Kantelberg reference below]
11a. Extract luminance, clip shadows & highlights (HistogramTransformation)
11b. Duplicate image and blur using ATrousWaveletTransform, deselecting first layer of 5 layers
11c. Combine duplicate with original image through inverted luminance mask using PixelMath expression: ~(~$T*~blurredDuplicate)
12. Reduce background brightness (GammaStretch R/K = 1.15 with inverted luminance mask)
13.  Reduce color saturation of red/magenta lens flare (ColorSaturation through flare mask X 2)
14. Increase color saturation (CurvesTransformation to S channel through luminance mask)
15. Reduce red rims around small stars caused perhaps by lens refraction (?)
15a. Generate mask selecting small stars by subtracting R channel from G channel, ATrousWaveletTransform, deselecting residual detail to remove everything else.
15b. Reduce S channel with CurvesTransformation using small star mask.
16. Increase color saturation (CurvesTransformation to S channel through inverted  luminance mask)
17. Reduce color saturation of red/magenta lens flare (ColorSaturation through flare mask X 2)
18. Reduce green cast (SCNR to green, amount 0.88 with inverted luminance mask)
19. Enhance dark dust lanes (DarkStructureEnhance script)
20. Increase contrast (LocalHistogramEqualization, kernal radius 150, contrast 2.0 amount 0.6 12-bit resolution with inverted luminance mask)
21. Increase color saturation (ColorSaturation through inverted  luminance mask)
22. Reduce red rims around small stars (step 15 above X2)
23. Reduce purple lens flare around bright stars
23a. Create mask selecting purple lens flare with ColorMask, hue 300-350 degrees, CloneStamp out everything but larges lens flare.
23b. Reduce color saturation of purple lens flare (CurvesTransformation to S using mask above).
23c. Decrease brightness of purple lens flare since the last step made them whiter and brighter (CurvesTranformation to RGB/K using mask above). Repeat last two steps twice.
24. Balance background blackpoint using a small preview in upper right corner and adjusting blackpoints of R, G and B channels until median value of preview is the same.
25. Reduce sizes of small stars (MorphologicalTransformation, morphological selection, size 3, iterations 2, amount 0.55, selection 0.25; mask selecting small stars generated with RangeSelection and cloning out larger stars).
26. Increase contrast in dark lanes of Milky Way (“S” curve in CurvesTransformation to RGB/k using inverted extracted green channel as luminance mask)
27. Reduce chrominance noise (ACDNR to chrominance with built-in luminance mask).
28. Increase contrast in dark lanes of Milky Way (“S” curve in CurvesTransformation to RGB/k using inverted extracted green channel as luminance mask)
29. Sharpen (UnsharpMask, stdDev 2.0, amount 0.56 with luminance mask).
30. Final crop (DynamicCrop)

References:

“M42 PixInsight Tutorial” by David Ault for linear noise reduction
http://trappedphotons.com/blog/?p=642

“Exponential Transformations”, Rob Kantelberg
http://www.astro-imaging.com/Tutorial/PixInsight/EXP/en.htm#0201