 |
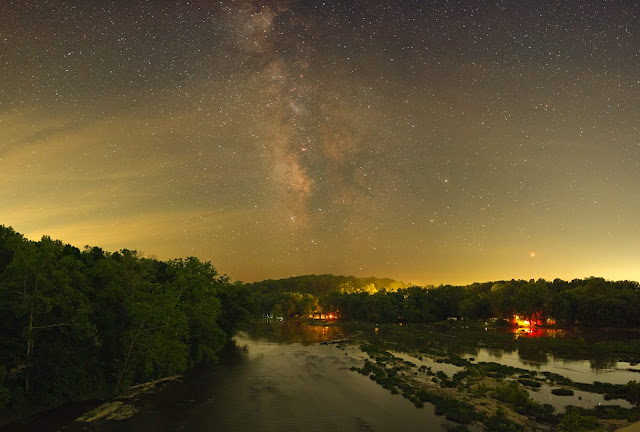
| Shenandoah River from Charles Town Road Bridge near Front Royal, West Virginia, July 11, 2016. Seven panel panorama (2 rows x 3 columns plus an extra), Canon 550D, Rokinon 16mm f/2.0 lens @ f/2.4, exposures 45 sec @ ISO3200 on Vixen Polarie Sky Tracker at 1/2 sidereal rate. Higher resolution version here. |
Here is another capture of the Milky Way over the Shenandoah River from my trip to Front Royal, WV last July. I spotted this location and Google Maps earlier that day and was happy that it was so beautiful when I arrived around midnight. The view is toward the south on the Charles Town Road Bridge which offered nice elevation, though it was a bit unnerving when cars whipped past at 55 mph. When cars weren’t making me want to leap off the bridge, the night was wonderfully quiet and I could hear the voices of fishermen and campers echoing through the river valley. I captured this six panel panorama in about 20 minutes before driving off to capture
another image along Millville Road. Rather than take the photo at the center of the bridge, I only went a couple of hundred yards from the east end such that the sand bars and plants in the river made leading lines from the lower right toward the center whereas the leading lines formed by the river bank on the right are at a different angle. I think the asymmetry makes the journey from the river to the Milky Way more interesting. Even though the sky was awash with the yellow light pollution from nearby Washington DC and other towns, it does not drive me nuts in this photo. I like how the Milky Way lays softly in the background and I tried to preserve that in post-processing. The light pollution scattered down from the clouds actually did me a favor by adding nice lighting to the foreground so I was able to capture quite a bit of detail. Plus, clouds tend to fatten up stars a bit which really helped make them stand out as well as make Saturn and Mars prominent.
-------------------------------------------------------------------------------------------
Processing Workflow
(LR) Lightroom, (ICE) Microsoft Image Composite Editor, (PS) Photoshop CC
-------------------------------------------------------------------------------------------
1. Raw conversion: correct lens distortion, exposure -0.3, blacks +25, noise reduction (luminance 7, color 18 all else default), export individual panels as sRGB 16-bit .tiffs (LR)
2. Stitch panels (ICE, spherical projection)
3. Duplicate into two layers - foreground and sky - sky layer on top (PS).
4. Generate layer mask for sky layer to mask foreground: in channels, duplicate blue channel, add levels adjustment to make foreground black and sky white. Load selection. Return to sky layers and add layer mask. Modify mask edge and add feathering to blend. (PS).
5. Remove light pollution gradient from sky layer by lowering red and green black points until a left hand curve edges of the RGB channels in a small selection at the very top of the image line up. (PS curves).
6. Darken the sky (PS curves).
7. Add contrast curve to the sky (PS curves).
8. Boost Milky Way saturation slightly to help it stand out from the yellow LP in the clouds (PS hue/saturation, increase saturation of reds +23).
9. Increase exposure of foreground slightly to help raise the brightness in the shadows (PS exposure gamma correction 1.10).
10. Small contrast curve to foreground (PS curves).
11. Convert to smart object (PS).
12. Sharpen for large scale details, Milky Way dust lane in particular (PS unsharp mask amount 7, radius 142).
13. Sharpen for small scale details (PS unsharp mask, amount 15, radius 11).
14. Final warping of edges, trying to maintain straight vertical lines (PS, warp).
15. Export as .tiff (PS).
16. Final crop (LR).
17. Resample to 4000 px on long edge while exporting to .jpeg (LR).